Deploy FSS in production
This tutorial explains how to deploy the Fullstack Scala Application in production with Docker.
For this example, we will use nginx-proxy-manager (opens in a new tab). The Nginx Proxy Manager is a basic interface for beginners and advanced users to create different types of Hosts to proxy their incoming home network traffic. This tool will allow us to proxy ingress traffic to specific containers on the host machine, from a understandable UI.
Follow the guide 🦮
Create a nginx-proxy-manager container
For this first step, you should define two domain name. One for the frontend and the other for the backend.
In this example we will use example.com for the frontend and api.example.com
Create a folder nginx-proxy-manager and paste the following code into a docker-compose.yml file:
version: '3.9'

services:
  nginx-proxy-manager:
    image: jc21/nginx-proxy-manager:2.9.19
    restart: unless-stopped
    ports:
      # Public HTTP Port:
      - '80:80'
      # Public HTTPS Port:
      - '443:443'
      # Admin Web Port:
      - '81:81'
    volumes:
      - ./data:/data
      - ./letsencrypt:/etc/letsencrypt
    healthcheck:
      test: ["CMD", "/bin/check-health"]
      interval: 10s
      timeout: 3s
    networks:
      - web-proxy
```docker filename="/nginx-proxy-manager/docker-compose.yml"
[...]
networks:
  web-proxy:
Run the container with :
docker compose up -dNow let's launch our application !
Modify the docker-compose
To deploy in production the project, a docker-compose file is written at the root of the directory, which exposes the application and
the chooses database.
We now need to bind the services to the external nginx-proxy-manager_web-proxy network.
To do so add an external network.
Get back into your application folder and modify the docker-compose.yml:
// TODO: Add the FINAL Docker compose
[...]
networks:
  nginx-proxy-manager_web-proxy:
    external: true
Change the value of API_URL for the value defined in the first step (api.example.com) for our example.
Launch the docker-compose:
docker-compose up -dNow let's expose our services on Internet
Expose our application on Internet
Create Proxy Host
Retrieve your IP:
curl ifconfig.meOpen your browser with the following url: <IP>:81/.
Add a proxy host for the Frontend
Click on the button Add Proxy Host
Add the information:
- Domain Name:
The value of theFRONTEND_URLDefined in Step 1.1. - Scheme:
http - Forward Hostname / IP :
http - Forward Port :
3000
Now let's define the SSL with the following:
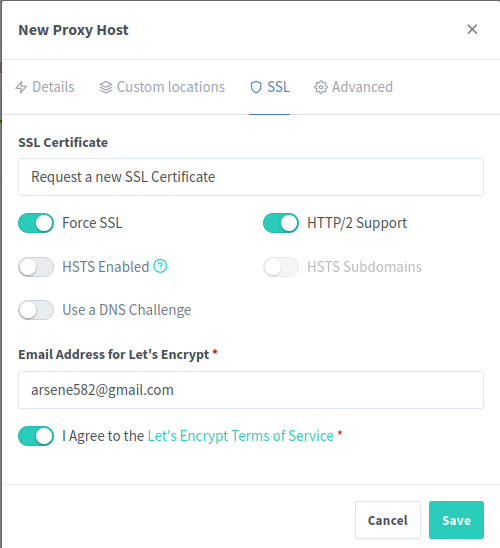
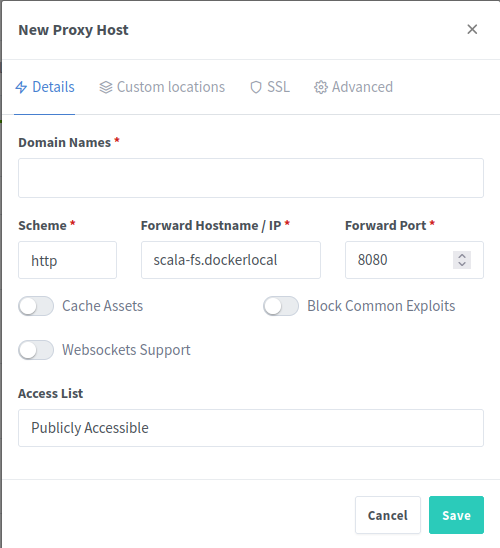
Add a proxy host for the Backend
Click on the button Add Proxy Host
Add the information:
- Domain Name:
The value of theAPI_URL(api.example.com) Defined in Step 1.2. - Scheme:
http - Forward Hostname / IP :
http - Forward Port :
8080
Now let's define the SSL with the following:
Great ! We now need to define DNS Record.
Create DNS Record
The application needs two DNS records to work properly:
- Frontend
- Name:
<domain_name>example.com - Type:
A - Content:
<your-server-public-ip>
- Name:
- Backend
- Name:
api.<domain_name>api.example.com - Type:
A - Content:
<your-server-public-ip>
- Name:
Congrats your application is deployed 🥳
Now let's open your browser at example.com (opens in a new tab) to check it out !